

Chamberlain LiftMaster Professional 1/2 HP Garage Door Opener: A Comprehensive Guide
This guide provides detailed instructions for the Chamberlain LiftMaster Professional 1/2 HP opener, covering installation, troubleshooting, maintenance, and safety procedures.
Explore the manual for wiring diagrams, component details, and support resources to maximize your garage door system’s performance and longevity.
Understand how to utilize the manual release, adjust settings, and address common issues for a seamless operational experience with your LiftMaster opener.
The Chamberlain LiftMaster Professional 1/2 HP garage door opener represents a robust and reliable solution for residential garage access. This opener, including models like the 3280 and 1265LM, is designed for durability and ease of use, offering a significant upgrade to standard garage door systems.
Understanding your opener’s functionality begins with familiarizing yourself with the accompanying manual. The manual, available through Chamberlain/LiftMaster support or online resources like eBay, provides crucial information regarding safety features, troubleshooting steps, and maintenance schedules. It’s essential for ensuring optimal performance and longevity.
This opener’s design incorporates features like safety reversing sensors and adjustable force settings, enhancing user safety and convenience. Proper installation and adherence to the manual’s guidelines are paramount for a secure and efficient operation. The manual is your key to unlocking the full potential of your LiftMaster system.
Key Features and Specifications
The LiftMaster Professional 1/2 HP opener boasts several key features detailed within its accompanying manual. These include a durable chain drive system, designed to minimize noise and maximize longevity, and safety reversing sensors crucial for preventing accidents. The manual emphasizes the importance of proper sensor alignment for optimal functionality.
Specific models, such as the 3280-267, offer a ½ horsepower motor providing ample power for most standard garage doors. The manual outlines procedures for adjusting travel limits and force settings to accommodate varying door weights and sizes. Understanding these specifications, as detailed in the manual, is vital for customization.
Furthermore, the opener incorporates diagnostic blinking lights, explained in the manual, to aid in troubleshooting. The manual also provides a wiring diagram for safe and effective electrical connections, ensuring a secure installation and operation.

Understanding the Components
The manual details each part – trolley, chain, sensors, and lights – explaining their functions and how they work together for safe, efficient garage door operation.
Trolley and Chain System
The trolley, guided along the garage door’s rail, connects to the chain driven by the opener’s motor. Refer to the manual for proper chain tensioning; a twisted chain indicates a need for adjustment.
Maintaining correct tension prevents operational issues and ensures smooth door movement. The manual illustrates how to check for chain twisting, typically around 13mm above the T-rail’s base at its midpoint.
Re-tightening the chain at this point corrects the issue. Understanding this system, as detailed in your LiftMaster manual, is crucial for preventing damage and ensuring the longevity of your garage door opener. Proper function relies on a well-maintained trolley and chain.
Safety Reversing Sensors: Functionality and Importance
The safety reversing sensors are critical components, preventing the door from closing on obstructions. Consult your manual for proper alignment; misaligned sensors cause operational failures. If the opener lights blink, this often indicates a sensor issue, requiring immediate attention.
Remove any obstructions blocking the sensors’ path, ensuring a clear line of sight between the sending and receiving eyes. The manual details the alignment process, typically found on page 23 of the Chamberlain LiftMaster 3280 manual.
Regularly test the sensors to confirm functionality, safeguarding against potential accidents. Properly functioning sensors are paramount for safe garage door operation, as outlined in your owner’s manual.
Opener Lights and Diagnostic Blinking
The Chamberlain LiftMaster opener’s lights serve both illumination and diagnostic purposes. Blinking lights indicate specific issues, guiding troubleshooting efforts. Refer to your manual to decipher the blinking patterns; each sequence corresponds to a different problem.

For example, blinking lights frequently signal a safety sensor obstruction or misalignment, as detailed in the Chamberlain LiftMaster 3280 manual. The manual provides step-by-step instructions for resolving these issues.
Understanding these light signals minimizes downtime and ensures efficient repairs. Always consult the manual before attempting any fixes, prioritizing safety and correct procedures. Proper diagnosis, aided by the blinking codes, is key to maintaining optimal performance.

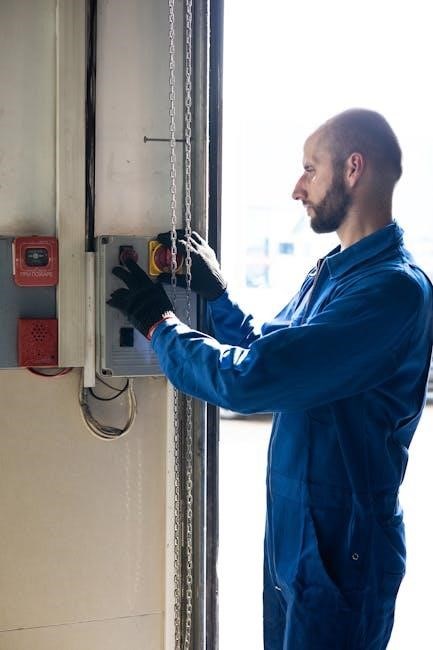
Manual Release Mechanism

The manual release allows disconnection of the trolley for maintenance or emergencies, as outlined in the Chamberlain manual. Use it to operate the door manually.
Locating and Activating the Manual Release
To locate the manual release, pull the red emergency release cord hanging from the trolley. This disengages the carriage, allowing for manual operation of the garage door. Ensure the door is unlocked before attempting to lift it manually. The release mechanism is designed for emergency situations or when maintenance is required.
After pulling the cord, the door can be lifted or lowered by hand. Remember that the safety sensors will be deactivated when the opener is disengaged. Always exercise caution and maintain a clear path during manual operation; Refer to your specific model’s manual for the exact location of the release cord, as it may vary slightly. Confirm the trolley is fully disengaged before proceeding with any maintenance tasks.
Disconnecting the Trolley

Following activation of the manual release cord, carefully observe the trolley’s movement. It will detach from the door’s horizontal track, enabling manual control. Ensure a firm grip on the garage door before fully disconnecting the trolley to prevent unexpected movement. The chain may return to its normal height once disengaged.
If the chain does return to its original position and the door still reverses on a one-inch board, adjustments are likely unnecessary. This indicates the issue isn’t related to trolley engagement. However, always prioritize safety and confirm the door operates smoothly and without resistance when manually lifting; Proper disconnection is crucial for safe maintenance and repair procedures.
Re-engaging the Trolley
After completing maintenance or repairs, re-engaging the trolley is essential for restoring automated operation. Gently pull the manual release cord towards the opener until you hear a distinct click, signifying re-engagement. Confirm the trolley is securely connected to the door’s horizontal track before testing.
Run the opener briefly to verify proper connection and functionality. If the door doesn’t respond, double-check the release cord is fully engaged. Ensure there are no obstructions preventing the trolley from moving along the track; A properly re-engaged trolley allows the opener to resume control, providing convenient and safe garage door operation. Always test the safety reversing sensors after re-engagement.

Troubleshooting Common Issues
Resolve frequent problems like door reversal on a one-inch board, safety sensor malfunctions, and chain twisting by consulting the manual for detailed solutions.
Door Reverses on One-Inch Board
If your Chamberlain LiftMaster door reverses after contacting a one-inch board placed in its path, the manual indicates several potential causes; First, verify the force settings aren’t too low; adjustments may be needed. Secondly, carefully inspect the safety reversing sensors, ensuring they are properly aligned and free from obstructions – even minor misalignment can trigger reversal.
The manual stresses that if the chain returns to its normal height when the trolley is disengaged and the door still reverses, no adjustments are necessary. However, if the issue persists, consult the wiring diagram to confirm correct connections. Remember to prioritize safety and disconnect power before any inspection or adjustment. Refer to page 23 of the manual for detailed sensor troubleshooting steps.
Safety Sensor Obstructions and Alignment
The Chamberlain LiftMaster manual emphasizes the critical role of safety reversing sensors in preventing door-related accidents. Obstructions – even small debris or cobwebs – within the sensor path will cause the door to reverse. Ensure the sensors are clear of any interference and that the receiving eye is properly aligned with the sender.
Misalignment is a common issue; the manual instructs to check the lens and ensure they are facing each other directly. If the opener lights blink, this often indicates a sensor problem. Refer to page 23 for specific troubleshooting guidance. Proper alignment is vital for safe operation, and regular inspection is recommended. Remember to disconnect power before making any adjustments to the sensors.
Chain Twisting and Adjustment
The Chamberlain LiftMaster manual addresses chain twisting as a potential issue affecting smooth operation. To prevent this, ensure the chain is properly tensioned and aligned within the track. If twisting occurs, the manual details a process for re-tightening the chain after it’s been allowed to settle.
Specifically, when the chain is approximately 13mm above the base of the T-rail at its midpoint, re-tighten it according to the instructions. This prevents excessive slack and minimizes the risk of future twisting. Regular inspection and adjustment, as outlined in the manual, will prolong the life of the chain and maintain optimal performance. Always consult the manual for detailed diagrams and safety instructions.
Adjusting the Opener Settings
The manual details how to fine-tune travel limits and force settings for optimal garage door operation, ensuring safety and smooth performance.
Adjust these settings carefully, referencing the manual’s guidance for precise adjustments tailored to your specific door.
Travel Limit Adjustments
Adjusting the travel limits dictates how far the garage door opens and closes. The manual emphasizes precise adjustments using the limit dials located on the opener unit. Upward travel is controlled by the “up” limit dial, while the “down” limit dial governs the closing distance.
Begin by loosening the wing nuts securing the dials, then incrementally adjust them. Small adjustments are crucial; observe the door’s movement after each tweak. Ensure the door fully opens without hitting the ceiling and closes completely without reversing prematurely.
The manual highlights the importance of setting the down limit to prevent excessive force, potentially damaging the door. Properly set limits contribute to smooth, safe, and reliable operation, extending the lifespan of your LiftMaster opener. Refer to the manual’s diagrams for dial locations and detailed instructions.
Force Setting Adjustments
Force settings determine the power applied to overcome resistance during door operation. The Chamberlain LiftMaster manual details adjustments for both upward and downward force. Incorrect settings can lead to the door reversing unexpectedly or applying excessive strain.
Adjustments are made using dials, typically marked with incremental settings. Start with the lowest force setting and gradually increase it until the door operates smoothly without struggling. Avoid excessive force, as it can damage the door or opener.
The manual stresses the importance of balancing force settings with safety. Properly adjusted force ensures the door closes securely while protecting against potential hazards. Regularly check these settings, especially after any door or hardware modifications. Consult the manual’s diagrams for precise dial locations and recommended settings;

Maintenance and Safety
Regular maintenance, like chain lubrication, ensures optimal performance. Always disconnect power before servicing, and never bypass safety features detailed in the manual.
Regular Chain Maintenance
Consistent chain maintenance is crucial for the longevity and smooth operation of your Chamberlain LiftMaster Professional 1/2 HP garage door opener. The manual emphasizes preventing chain twisting, which can strain the system. Regularly inspect the chain for any signs of wear, damage, or excessive slack.
Lubrication is key; apply a suitable chain lubricant sparingly to avoid attracting dirt and debris. Ensure the chain remains properly tensioned – the manual details adjustments when the chain sits approximately 13mm above the T-rail’s base at its midpoint.
Periodic checks will help identify potential issues before they escalate, reducing the need for extensive repairs and ensuring reliable performance. Refer to your specific model’s manual for recommended lubrication intervals and detailed adjustment procedures.
Safety Precautions During Maintenance
Prioritize safety when performing any maintenance on your Chamberlain LiftMaster Professional 1/2 HP garage door opener. Always disconnect the power supply to the opener before beginning any work to prevent accidental operation and electrical shock.
Utilize the manual release to disconnect the trolley before inspecting or adjusting the chain or other components. Be mindful of the door’s weight and ensure it’s securely supported if fully disconnected.
Never attempt repairs beyond your skill level; consult a qualified technician for complex issues. Wear appropriate safety glasses and gloves during maintenance. Keep children and pets away from the work area. Refer to the manual for specific safety warnings related to your model.
Wiring Diagram and Electrical Considerations
Consult the manual for a detailed wiring diagram specific to your LiftMaster model. Ensure all electrical work adheres to local codes and safety guidelines.
Understanding the Wiring Diagram (Refer to Manual)
The wiring diagram, found within your Chamberlain LiftMaster Professional 1/2 HP opener’s manual, is crucial for safe and correct installation or repair. It illustrates the connections between the opener unit, power source, safety sensors, and any optional accessories like wall controls or wireless keypads.
Carefully examine the diagram to identify each wire’s function and corresponding terminal. Pay close attention to color coding, as this is a standard practice for electrical systems. Incorrect wiring can lead to malfunction, damage to the opener, or even electrical hazards.
The manual will detail the voltage requirements and amperage ratings for each component. Always disconnect the power supply before working with any wiring. If you are uncomfortable with electrical work, consult a qualified electrician to ensure a safe and proper installation.
Electrical Safety Guidelines
Prioritizing electrical safety is paramount when working with your Chamberlain LiftMaster Professional 1/2 HP garage door opener. Always disconnect the power supply at the circuit breaker before performing any maintenance or repairs involving electrical components. Never work with wet hands or in damp conditions.
Inspect wiring for damage, such as frayed insulation or loose connections, and replace any compromised wires immediately. Avoid overloading circuits with excessive accessories. Ensure all connections are secure and properly grounded to prevent electrical shock.
If you are unsure about any aspect of the electrical work, consult a qualified electrician. Refer to the manual for specific voltage and amperage requirements. Ignoring these guidelines can result in serious injury or damage to the opener.
Finding Your Manual and Support Resources
Locate your specific LiftMaster model’s manual online or through Chamberlain’s support channels for detailed diagrams and troubleshooting. Contact Chamberlain/LiftMaster directly for assistance.
Locating the Correct Model Manual
Finding the right manual for your Chamberlain LiftMaster Professional 1/2 HP garage door opener is crucial for proper operation and maintenance. Start by identifying your specific model number, often found on a sticker located on the opener unit itself.
Chamberlain’s website offers a comprehensive archive of manuals; simply search using your model number to download a PDF version. Alternatively, resources like eBay may offer physical copies of older manuals, such as the 3280 or 3280-267 models.
If you’re unsure of your model, contacting Chamberlain/LiftMaster’s support team directly can help pinpoint the correct documentation. Having the serial number available will expedite the process. Accessing the manual provides essential wiring diagrams, safety instructions, and troubleshooting guidance tailored to your opener.
Chamberlain/LiftMaster Support Contact Information
For direct assistance with your Chamberlain LiftMaster Professional 1/2 HP garage door opener, several support channels are available. You can reach Chamberlain Group, Inc. at their headquarters located at 845 Larch Avenue, Elmhurst, Illinois 60126-1196.
Their official website provides a wealth of resources, including FAQs, troubleshooting guides, and downloadable manuals. For personalized support, a customer service team is available to assist with inquiries regarding your specific model.
While a direct phone number isn’t prominently displayed, utilizing the “Contact Us” section on their website will guide you to the appropriate support options. Having your model and serial number ready will streamline the support process, ensuring efficient assistance with any concerns.